
Step 1: Overview
1 of 1 Garden waterfalls
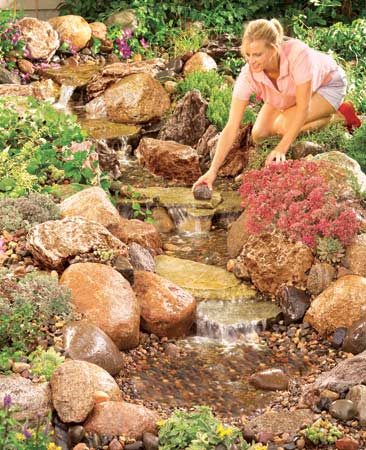
Completed stream
Placing rocksWe designed this stream to eliminate the filtering and cleaning maintenance that comes with ponds. The trick to low maintenance is to let nature (layers of gravel and stone) filter the water, using an underground sump at the lower end to catch the filtered water before pumping it back up to the top of the stream. All you have to do is occasionally add water to replace what evaporates—and rainfall may handle this task for you. In this story, we'll show you how to slope the stream, lay the liner and install the pump and the catch basin as well as landscape the stream. We'll help you plan the ideal location and size of your stream, and tell you how to select liners, pumps and stone. We won't get into kits that are available either on-line or at home centers. We chose to build our system with parts and components that are readily available and less expensive than kits. They'll give you more flexibility to design the stream that best fits your yard.
You can complete this project successfully even if it's your first water feature. But it's heavy work. The only special tools you'll need are a strong wheelbarrow (one with pneumatic tires is best) and a two-wheel ball cart for moving and placing heavy boulders.
Caution!
Although these pools are shallow, they can be a drowning hazard for small children. Check with your local building department for local regulations. And be watchful of toddlers.Step 2: Select a location buid a Garden waterfalls
Sit in a favorite spot and visualize where a stream with waterfalls would fit into your landscape—perhaps near a patio or deck.Planning elements to consider:
Foundation
If your soil is easy to dig, then excavate the entire project. If digging is difficult, build your stream above ground with stones for the base.
Slope
Very little slope is needed (minimum 2 in. drop per 10 ft. of stream). For faster moving water or taller waterfalls, make the grade steeper (which also adds more sound).
Size
Plan your stream size first to determine how much water the lower basin and upper pool must hold when the pump is off. Figure 5 gallons per linear foot of flowing stream (2-1/2 ft. wide x 3 in. deep). Our lower basin (40 gallons) and upper pool (240 gallons) easily held our 75-gallon stream capacity.
Sound
For a babbling brook sound, use a waterfall height of 2 to 4 in. To drown out street noise, use 10-in. and greater waterfall drops. More waterfalls equals more noise.
Location
Waterfalls should be visible from your favorite deck, patio or inside-the-home chair. Consider a location near the bedroom if you like the sound of running water at night; you can always turn it off if it's too loud or distracting. Make sure your pump location (lower basin) is close to an electrical source, and that you can reach the stream with a garden hose to add water as needed. For our site, we wrapped an S-shaped stream next to a ground-level deck built into an existing perennial garden. We varied the height of the four waterfalls and the width of the stream to give it a more natural look and sound. Plus we added a ball valve to the return water line so we could speed or slow the flow rate, and control the sound level.
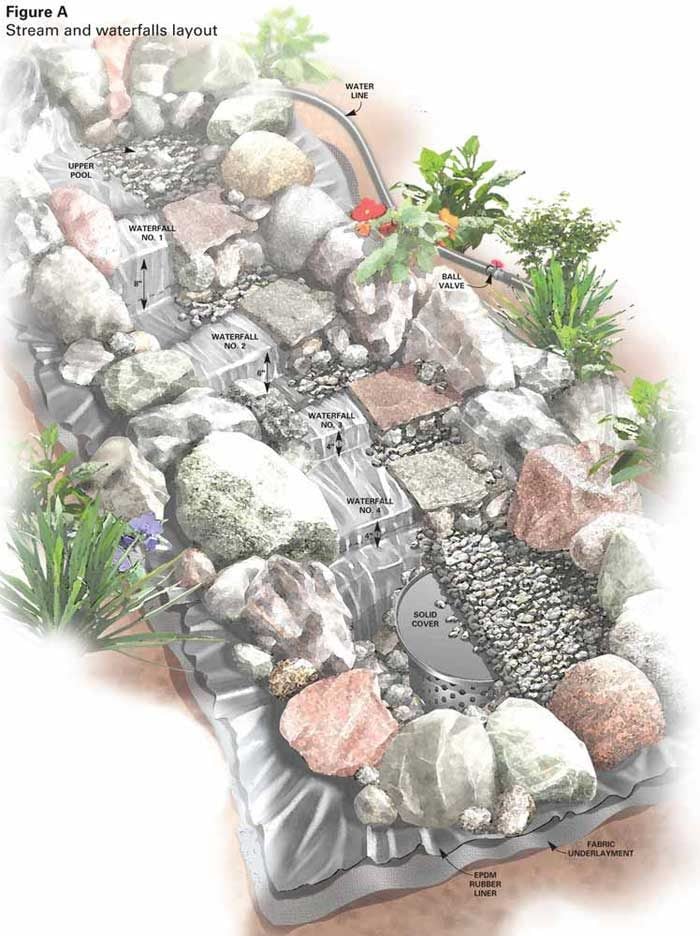
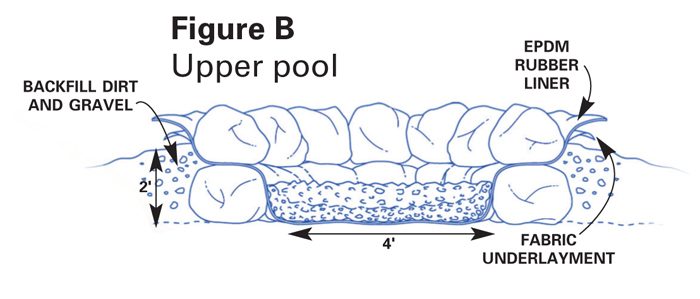
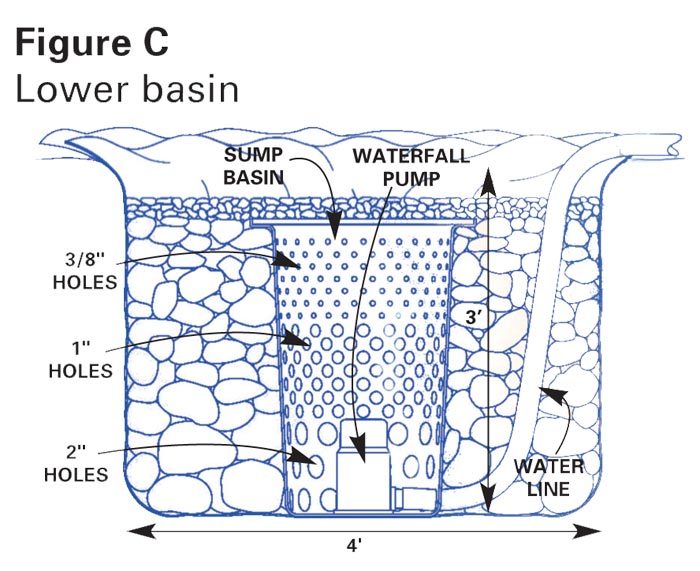
Figures A-C: Stream and Waterfalls Layout
Use these illustrations to help you plan your water feature.Step 3: Order Stone
When you start your stone search, look under “Rock,” “Quarries” or “Sand & Gravel” in the Yellow Pages or online. Call to check prices and types of stone available. Go visit dealers to get exactly what you want, plus you can select specific colorful accent boulders and flat stones for the waterfalls—then have it all delivered. Some quarries will even bag the stone by type and size (for a fee), and these palleted bags take up less space on a driveway, as opposed to piles of gravel and boulders.For gravel (3/4-in. to 2-in. stones), figure you'll need 1/2 ton per 10 ft. of stream, plus we used 1 to 1-1/2 tons for the upper pool and lower basin. For basic field boulders (6 in. to 24 in.) to line the stream banks, figure 3/4 ton per 10 ft. of stream. Add 1-1/2 to 2 tons more of larger 12-in. to 24-in.boulders for the upper pool and lower basin. Because we built the top half of the stream above ground, we used 3-1/2 tons of extra boulders.
If you want specialty colorful accent boulders, expect to pay premium prices. Avoid limestone, as it can encourage algae growth.
Caution!
A few days before you plan to dig for your stream, call 811 to have underground utilities in the area located and marked.Step 4: Map the stream and start digging
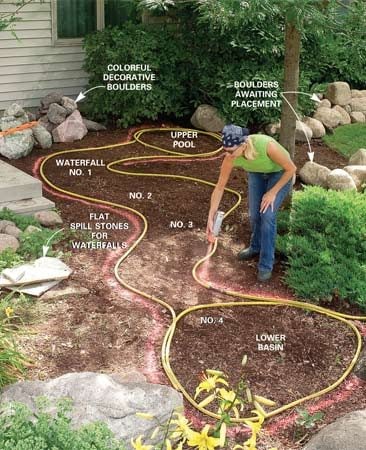
1 of 2 Garden waterfalls
Photo 1: Design the stream buid a Garden waterfalls
Haul in your boulders and stones and place them around the worksite. Outline the location of your stream with a garden hose, then paint a line around it. Also use paint to mark waterfall locations and ideal spots for large decorative boulders.
« Previous Photo
Next Photo »We built the upper half of the stream and two waterfalls above the ground, then carved the lower half of this 15-ft. stream out of the soil (Figure A). Pick whichever technique works with your soil and go with it. Either way, keep the ibuprofen handy to soothe those sore lifting and digging muscles!
Next, dig the lower basin for the sump basin and surrounding stone and gravel. Dig a square hole at least 2 ft. wider than the basin diameter and 6 in. deeper than the height. It should be at least a foot wider than the stream.
Simultaneously, build a ring of stone for the upper pool foundation and the stream banks (Photo 2). Place 12-in. tall stones flat side up (if possible) so the next layer of stone will fit more securely on top (Figure B). Use a rubber mallet to pack dirt and gravel tightly around the stones to hold them in place.
Step 5: Complete the lower basin first
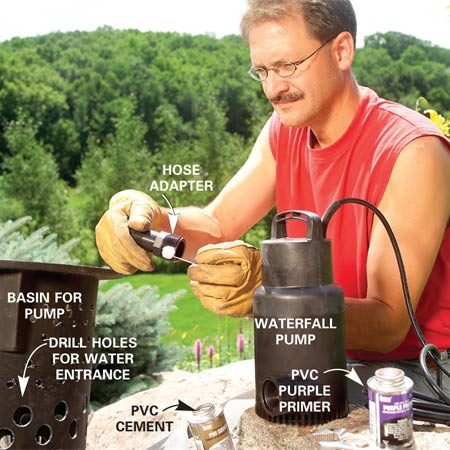
1 of 2 Garden waterfalls
Photo 3: Prepare the basin and pump buid a Garden waterfalls
Drill holes in the basin using three different size hole saw bits (see Figure C). Prime, cement and attach the hose adapter to the pump.
« Previous Photo
Next Photo »Remove sharp objects from the bottom of the basin, then lay in the underlayment and liner. Calculate the size carefully and cut the underlayment first. Then cut and fit the liner so it is tucked in all corners and extends about 2 ft. out of the hole in all directions. With the pump basin in place, insert the pump, connect the water line and lay it in place to ensure it will reach the top of the upper pool. Add layers of stone around the basin and top with the lid (Figure C and Photo 4).
Step 6: Dig out (or build) a long staircase
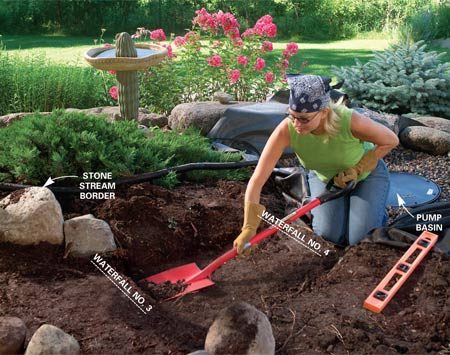
1 of 2 Garden waterfalls
Photo 5: Dig the streambed buid a Garden waterfalls
Carve a winding stream bed 6 to 8 in. deep, 2 to 3-1/2 ft. wide. Dig the channel so it stair-steps down at waterfall No. 3, and dig 3- to 4-in. deep pools below waterfalls No. 2 and 3 (Figure A).
« Previous Photo
Next Photo »Since we built above ground for the upper section of the stream, we next added a level row of stones for waterfalls No. 1 and 2 (Photo 6). Pick the height you desire. Use 6- in. tall stones to frame the banks. Also finish compacting a gravel and dirt mixture to the inside and outside of the upper pool stones. Then tamp down the upper pool area and the streambed.
Step 7: Lay the liner and position waterfall stones
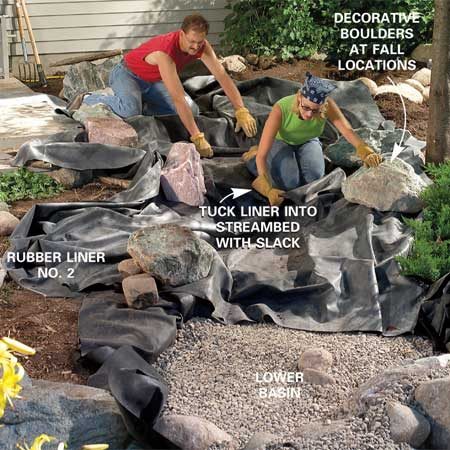
1 of 2 Garden waterfalls
Photo 7: Spread the liner in the streambed buid a Garden waterfalls
Lay the underlayment and a rubber liner into the streambed. Leave 3 to 4 in. of slack in the liner at the base of the waterfalls, extend about 2 ft. up each bank and overlap the basin liner by 2 ft. Place decorative boulders at waterfall locations.
« Previous Photo
Next Photo »Step 8: Add spill stones and foam the gaps
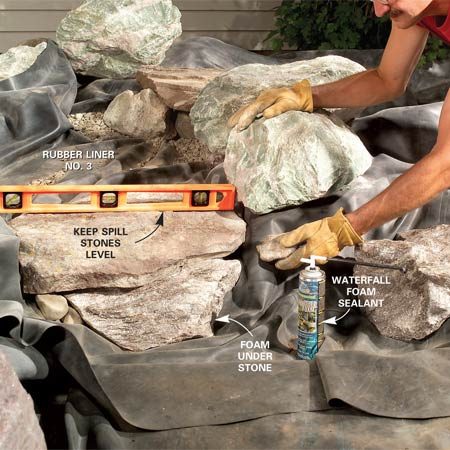
1 of 2 Garden waterfalls
Photo 9: Buid a Garden waterfalls
Set decorative boulders at each side of waterfalls No. 1 and 2. Then coat the bottom of the flat spill stones with foam sealant so they adhere to the liner. Wedge stones into cracks between the spill stones and the sides of the stream bank.
« Previous Photo
Next Photo »Step 9: Add gravel and clean the stream

1 of 2 Garden waterfalls
Photo 11: Add boulders to complete buid a Garden waterfalls
Add a top layer of small boulders to complete the upper pool and streambed. Place steppingstones in the middle of the stream and the stones below the waterfalls. Cover the rest of the streambed liner with gravel.
« Previous Photo
Next Photo »Spray down the entire stream area with a garden hose nozzle until the water level rises above the gravel in the bottom basin. Now power up the pump and direct the pump hose away from the stream. Keep washing down the stream and rock until the water from the pump hose runs clear. Then insert the pump hose into the upper pool (make sure it is hidden), and finish your stream by trimming and covering any rubber liner that shows (Photo 12).
Now it's time to take that favorite seat, with a cold beverage in hand, and relax to the soothing sounds of your new stream.
 Sound is determined by a number of factors:


 The ease of small garden ponds comes with lower maintenance, coupled with lower electric consumption.
 In addition to this, the elevation of the ground and condition of the
soil should factor into location of the pond because you want to be able
to dig it, but also see it from your house or deck. Obviously, if your
terrain is hilly or rocky, there could be some modifications necessary
before the digging begins. If there are no trees to shade the area, then
you will need to place plants in and around the pond.
In addition to this, the elevation of the ground and condition of the
soil should factor into location of the pond because you want to be able
to dig it, but also see it from your house or deck. Obviously, if your
terrain is hilly or rocky, there could be some modifications necessary
before the digging begins. If there are no trees to shade the area, then
you will need to place plants in and around the pond.


